Sauna Installation Guide: Step-by-Step Planning
11 Minute Read
Need help installing a home sauna? This sauna installation guide covers planning, choosing a location, selecting the type, and installation. Let’s dive in.
Key Takeaways
- Planning is key: Choose the right location, sauna type, and secure all necessary permits before starting your installation.
- A stable foundation and proper insulation are crucial for a successful sauna setup, ensuring safety and efficiency.
- Regular maintenance, including cleaning and inspections, is essential for prolonging your sauna’s life and ensuring a safe experience.
Planning Your Sauna Installation
Before starting your sauna installation, meticulous planning is crucial. The smallest oversight can lead to significant setbacks, turning what should be a seamless addition into a frustrating project. Key considerations include selecting the right location, deciding on the type of sauna, and ensuring you have all necessary permits in place. Focusing on these aspects helps you avoid common pitfalls and ensures a successful installation.
Having a sauna at home is more than possible; it’s a rewarding experience that blends relaxation with health benefits. The home sauna installation process involves careful planning and choosing the right components to fit your needs and space. Home saunas offer an excellent way to enhance your wellness routine.
First, let’s focus on choosing the perfect location for your sauna.
Choosing the Perfect Location
Finding the ideal spot for your sauna is crucial. Indoor saunas can be installed in various locations, such as the attic, basement, or even the bathroom, each offering unique advantages like warmth or privacy. When selecting your sauna’s location, consider the available space and ensure that the dimensions, including doorways and hallways, allow for easy installation. Proper ventilation is essential to maintain air quality and prevent overheating, with garages often providing easier ventilation compared to other locations.
Accessibility is another key factor. The chosen location should be convenient for regular use by you and your family. Whether indoors or outdoors, ensuring that the sauna is easily accessible will enhance your overall sauna experience. Carefully considering these elements helps you select a location that maximizes both convenience and functionality.
Deciding on Sauna Type
Selecting the type of sauna is a pivotal decision in the indoor sauna installation process. Indoor saunas offer:
- Convenience and privacy, making them suitable for year-round use
- Options to be custom-built or acquired as pre-fabricated kits
- An average installation cost of around $4,500
On the other hand, outdoor saunas require a level area with good drainage and proximity to utilities, but they offer more space and can enhance your property’s aesthetics, providing a connection advantage in life, including a pool.
Infrared saunas are another option to consider for those seeking rest in a sauna room. They use advanced technology to provide therapeutic benefits, encouraging relaxation, releasing muscle tension, and enhancing overall mood and well-being.
Whether you opt for an indoor sauna or outdoor sauna, or decide to explore the benefits of infrared saunas, each type has its unique advantages that can cater to your personal preferences and space availability.
Permits and Regulations
Navigating the world of permits and regulations can seem daunting, but it’s a vital part of the sauna installation process. Understanding your local building codes is crucial, as these regulations dictate where and how you can install your sauna. These codes may specify the types of materials you can use and include safety requirements, such as fire codes, which must be adhered to.
Before you begin the installation, apply for the necessary permits from your local authorities to ensure you’re in compliance with all regulations. Failure to do so can result in fines, the removal of your sauna, or complications when selling your property.
Securing the proper permits and understanding the regulations allows you to proceed confidently, knowing your installation meets all legal requirements with expert guidance.
Preparing for Installation
With your planning complete, it’s time to prepare for the installation. Creating a solid foundation is a key step, ensuring your sauna is stable and secure. If you’ve chosen a pre-built sauna, the installation process will be simpler and typically requires two people. The area should be clean and free of debris before you begin laying the foundations and flooring.
Proper ventilation is crucial at this stage to maintain air quality and prevent overheating. Ensuring all cables are checked and pushed in before installing the roof will streamline the process.
Whether you’re working with wood, vinyl, or concrete, selecting durable materials for the flooring is essential to withstand the sauna’s heat and moisture. Next, we’ll explore the specifics of preparing your sauna’s foundation and flooring.
Foundation and Flooring
A level and stable area is critical for the sauna foundation to ensure proper installation. During the installation, place the bottom panel on the floor first for stability, making sure the flat side is facing up and securely nestled into the wall corner. Choosing the right materials for the flooring, such as concrete, wood, or vinyl, is crucial for durability and to withstand the moist and heated environment.
Whether you’re installing your sauna in a basement, attic, or dedicated room, ensuring a solid foundation will enhance the longevity and safety of your sauna. Properly preparing the foundation and flooring sets the stage for a successful installation process.
Assembling the Frame and Walls
Assembling the frame and walls is the next step in the installation process. Follow these steps:
- Install the back panel onto the base.
- Secure the left side panel.
- Insert the front window panel, ensuring all grooves align correctly and the unfinished side faces inward.
- Use corner moldings to enhance the structural stability of the sauna walls during assembly.
Ensure all connections are secure and fasten the outside buckles after panel installations. Finish by fastening the roof panels and making final adjustments to ensure everything fits snugly. Following these steps ensures you assemble a sturdy and reliable frame and walls for your sauna.
Insulation and Moisture Barrier
Insulation plays a vital role in maintaining heat inside the sauna, making your sessions more efficient and enjoyable. Once you insulate the sauna, follow these steps:
- Apply a foil vapor barrier to help prevent moisture damage.
- Seal the seams and edges of the vapor barrier.
- Use aluminum tape for sealing to ensure the effectiveness of the vapor barrier.
Proper insulation and moisture barriers are essential for creating a comfortable and long-lasting sauna environment. These steps protect your investment and enhance the overall sauna experience.
Installing Essential Components
With the structure in place, it’s time to install the essential components of your sauna construction. This includes:
- The heater
- Ventilation systems
- Benches
- Lighting
Ensuring all components are securely installed and connected is crucial for the proper functioning of your sauna. A dedicated circuit for the sauna heater is essential to prevent electrical overload and reduce fire risks.
Moisture-resistant lighting is recommended to ensure safety and functionality in the humid sauna environment. Heater stones should be cleaned and checked annually to maintain optimal performance.
We’ll now explore the detailed steps for installing the sauna heater, ventilation, and adding benches and lighting.
Installing the Sauna Heater
Installing the sauna heater is a critical step that requires careful attention to safety clearances and connections. Heaters typically require specific clearances to ensure safe operation and prevent overheating. You will require a thermostat for temperature regulation. Additionally, a control panel is necessary for managing the settings. Start by installing the bench heater panel into the right side panel and ensure the bench heater cable is securely connected.
During roof installation, push the heater plugs through the holes around the top panel and connect them. The first step in installing the control panel is to find the flat connector wires. After locating them, proceed to connect the wires. Following these steps ensures the safe and effective installation of your sauna heater.
Ventilation and Airflow
Proper ventilation is essential for maintaining air quality and preventing mold growth in your sauna. It helps regulate temperature and humidity levels, ensuring a comfortable and safe environment.
Make sure to install air inlets near the floor and exhaust vents near the ceiling to achieve proper ventilation and airflow.
Adding Benches and Lighting
Adding benches and lighting completes the sauna installation, enhancing both comfort and ambiance. Start by:
- Sliding the left bench panel onto the left bench heater panel.
- Sliding the right bench panel onto the right bench heater panel.
- Securing the top part onto the lower part to ensure stability.
For lighting, choose options that are heat-resistant and suitable for the sauna environment, such as therapeutic red light, high-output chromotherapy, and LED reading lights. Proper lighting enhances the overall sauna experience, creating a relaxing and inviting atmosphere.
Electrical and Safety Considerations
Ensuring electrical safety and following proper guidelines is crucial for a safe sauna installation. Depending on the type and location of your sauna, you may need both building and electrical permits. GFCI protection is essential as it quickly detects electrical current leaks and prevents shocks.
Regular inspections of sauna heaters and other electrical components help maintain safety and performance. Installing a sauna door that opens outward is also crucial for safety, allowing for easy exit in case of an emergency.
Next, we’ll discuss the details of electrical wiring and safety precautions.
Electrical Wiring
Hiring a professional electrician for your sauna’s electrical installation is crucial to ensure safety and compliance with regulations. Proper installation protects users from potential hazards associated with incorrect electrical setups. When installing an electric sauna heater, consider wiring, ventilation, and safety measures to enhance performance.
Using NN type wiring with a gauge of 8-10 helps prevent overheating. Before connecting control panel wires, ensure to insert the stereo into the mounting box for a secure fit. These steps contribute to the efficient operation and longevity of your sauna.
Safety Precautions
Maintaining safety distances and proper maintenance for heaters involves:
- Keeping safety distances between the heater and combustibles, recommended between 50 cm to 1 meter.
- Installing guards around the heater to prevent contact and burns.
- Performing regular checks on control panels and components for ongoing sauna maintenance.
Following these safety precautions ensures a safe and enjoyable sauna experience.
Finishing Touches and Enhancements
The final steps in your sauna installation involve adding finishing touches and enhancements that elevate your sauna experience:
- Outdoor saunas can enhance property value and aesthetics.
- They offer more space and longevity.
- The last step in preparing the sauna for use is plugging it into the wall.
Now, we’ll explore the details of installing the door and accessories, and how to customize your sauna experience for maximum relaxation and enjoyment. For more detailed instructions and user manuals on installation and care, you can refer to the official Jacuzzi® guides.
Installing the Door and Accessories
Installing a tempered glass door for your sauna is recommended for safety and durability. Ensure the door is installed to open outward, allowing for easy exit in case of an emergency. Accessories that can enhance the sauna experience include:
- Thermometers
- Buckets
- Ladles
- Towel racks
Towel racks and thermometers are essential accessories that contribute to a well-rounded sauna environment.
Taking the time to install the right door and accessories not only completes the installation process but also ensures a safe and enjoyable sauna experience. These finishing touches can transform your sauna into a personal haven of relaxation.

Explore Saunas


Customizing Your Sauna Experience
Customizing your sauna experience can turn your home sauna into a personal oasis. Incorporating a sound system with water-resistant features can significantly improve the ambiance during sauna sessions, allowing you to enjoy your favorite music while you relax. A Bluetooth speaker system offers a personalized audio experience, enhancing the overall sauna atmosphere.
Adding essential oils in aroma dispensers can create a soothing atmosphere, making your sauna sessions even more enjoyable. These enhancements collectively contribute to a more immersive and relaxing sauna environment, transforming your sauna into a sanctuary for relaxation and well-being.
Post-Installation Care and Maintenance
Proper care and maintenance are crucial to ensure the longevity and safe operation of your sauna. Regular inspections can help identify issues early and maintain a safe sauna environment. After each sauna session, open the door to air out the sauna, which helps manage humidity levels and maintain proper ventilation.
Routine cleaning is also essential. Wipe down the sauna with a damp cloth after each use to maintain hygiene and wood integrity. Let’s explore the steps for routine cleaning, wood and heater maintenance, and managing humidity levels.
Routine Cleaning
Routine cleaning is vital for maintaining hygiene and ensuring the longevity of your sauna. Use a damp cloth to clean the sauna after each use, and a soft brush with warm water for cleaning sauna benches. These regular cleaning routines contribute to a more enjoyable sauna experience and help keep the sauna in optimal condition.
Incorporating these cleaning practices into your routine ensures that your sauna remains a clean, inviting space for relaxation and wellness.
Wood and Heater Maintenance
Regular maintenance checks for the wood and heater are essential for safety and performance. Inspect seals around doors and windows regularly to prevent water damage and air leakage. Applying paraffin oil to wood surfaces helps reduce humidity absorption and enhances longevity.
Ensure there are no issues with the heater or chimney by conducting regular inspections. Replace any cracked or deteriorated sauna rocks during maintenance checks to ensure safety and functionality.
These maintenance practices will help you get the most out of your sauna and ensure it remains a safe and enjoyable space.
Managing Humidity Levels
Managing humidity levels is crucial for maintaining comfort and efficiency in your sauna. The primary tools needed for humidity control in traditional saunas are a bucket and ladle. Proper humidity management ensures a comfortable sauna environment, enhancing the overall experience.
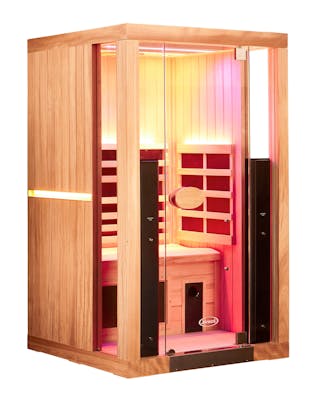
Exploring Jacuzzi Saunas
Jacuzzi Infrared Saunas offer a unique blend of advanced technology and therapeutic benefits:
- Utilize carbon and ceramic heaters
- Emit infrared light that targets the body directly
- Provide effective heat therapy at lower temperatures, typically between 110°F and 140°F
This makes Jacuzzi Infrared Saunas comfortable while still delivering the desired therapeutic effects.
Designed with durable materials and user-friendly controls, Jacuzzi Infrared Saunas are built to withstand frequent use and offer easy adjustments of temperature and session settings. These saunas also incorporate wellness features like red light therapy and chromotherapy to enhance the user experience, promoting overall wellness by reducing stress, alleviating pain, and improving sleep quality.
Their compact design allows them to fit into various ample space rooms de in the home, offering versatility for users.
Summary
Embarking on the journey to install a home sauna can be a rewarding experience, offering a personal retreat for relaxation and wellness. From meticulous planning and choosing the right location and type to navigating permits and regulations, each step is crucial for a successful installation. By preparing the foundation, assembling the frame and walls, installing essential components, and ensuring proper electrical and safety considerations, you can create a safe and inviting sauna environment. Enhancements and regular maintenance will ensure your sauna remains a sanctuary for years to come. So, why wait? Start planning your sauna installation today and transform your home into a haven of tranquility and rejuvenation.
Frequently Asked Questions
What are the benefits of having an indoor sauna?
An indoor sauna offers the convenience of year-round use in the comfort of your home, along with privacy and ease of access. You can enjoy a relaxing experience whenever you want!
What materials are best for sauna flooring?
For sauna flooring, durable materials like concrete, wood, or vinyl work best. They can withstand moisture and heat, ensuring a safe and comfortable environment.
Do I need a permit to install a sauna?
Yes, you'll likely need a permit to install a sauna to comply with local building codes, so it's best to check with your local authorities first.
How do I maintain proper ventilation in my sauna?
To maintain proper ventilation in your sauna, make sure to have air inlets close to the floor and exhaust vents near the ceiling. This setup allows for effective air circulation, keeping your sauna comfortable and safe.
What are the unique features of Jacuzzi Infrared Saunas?
Jacuzzi Infrared Saunas stand out with their advanced carbon and ceramic heaters, easy-to-use controls, and added wellness benefits like red light therapy. These features create a relaxing and health-focused experience.
Learn More With Our Hot Tub Buying Series
Unlock the secrets to the perfect hot tub with our exclusive email series. Get expert advice and tips right in your inbox. Subscribe now and take the first step towards finding your ideal hot tub.
Hot Tub Buying Series
Explore Categories


Explore Products


Swim Spa
The latest powerful swim current technology and the historic performance of Jacuzzi® PowerPro™ jets combine to deliver the perfect swim, year-round.

Sauna
Jacuzzi® Infrared Saunas are engineered with full spectrum (near, mid and far) front-facing IR heaters, along with Red Light therapy. Enjoy a comprehensive sauna experience in a single sauna session.