
We're here to help
We’ve enhanced our customer support programme to better serve you by empowering our nationwide network of over 70 approved hot tub and swim spa specialists to provide more direct, responsive product care.
This means we no longer provide direct frontline support for in- and out-of-warranty end consumer enquiries. Instead, your primary point of contact for product support and service is now the specialist retailer or partner you purchased from. This support continues to be backed by Jacuzzi Group UK.
Below you will find useful information relating to Jacuzzi® products, followed by details on how to contact us for support. Please note that we can only assist you with genuine Jacuzzi® products.
I'm looking for information about my Jacuzzi® hot tub...
Serial number locations vary dependent on the type of Jacuzzi® hot tub, they are usually located on:
- The inside the hot tub by the filter
- On the base of the back right of the hot tub
- Positioned directly inside the cabinet when you remove the front panel.
Most of our local authorised dealerships offer hot tub moving services. Please contact your local dealer to discuss options. You can find more details about who this is by heading to our dealer locator.
Many our local authorised dealerships offer servicing programmes for your Jacuzzi® Hot Tub. Please contact your local dealer to discuss options and plans. You can find more details about who this is by heading to our dealer locator.
Many our local authorised dealerships offer a moving service for your Jacuzzi® Hot Tub. Please contact your local dealer to discuss options and plans. You can find more details about who this is by heading to our dealer locator.
There are a variety of codes that may appear on your hot tub display panel and the code shown will change the action required. The most common codes you may see are:
Code: FL1
What it means: this means there is something affecting the flow of water in your hot tub.
Note: The display will alternate between “FL–1,” scrolling message “FLOW ERROR OPEN” and the current water temperature.
How To Solve:
- Turn the power off
- Check the water level is below the bottom of the pillows. Add water if necessary.
- Check filters and wash clean if clogged. To save time we recommend having a second, clean filter you can replace immediately.
If this doesn't solve the problem, or the problem persists complete the form below and our Customer Care team will contact you to advise further
Code: BLB
What it means: It’s time to change your ClearRay UV bulb to keep your filtration system in peak condition.
How to solve:
You will need to purchase a new bulb from your local authorised dealer. Once purchased you can change the bulb by following the instructions within the bulb packaging.
For any other codes, complete the form below and our Customer Care team will contact you to advise further
It is mandatory that the UV bulb is replaced and the quartz tube is cleaned every 12 months to maintain optimum performance.
Instructions for changing your ClearRay bulb can be found in the packaging of your new bulb. We have also included them below. If you need further assistance, you can view our video guide
Fitting your ClearRay® bulb
DANGER: Turn the hot tub breaker to the off position! Never look at the lit bulb. This can cause severe eye damage or blindness. Never remove the cover without first turning off at the power source and draining the hot tub.
WARNING: Drain the hot tub if you are replacing or cleaning the quartz tube. Allow the bulb to cool down prior to removing from the quartz tube.
The Location of the ClearRay System and connection may vary by model. If you are only replacing the UV bulb and NOT cleaning the quartz tube then the hot tub does not need to be drained. You will always need to drain the hot tub if you are cleaning or replacing the quartz tube.
- Turn the breaker to the hot tub off. Drain the hot tub.
- Once the UV bulb has cooled off, remove the ClearRay system enclosure cover and gasket by removing the four screws. This will expose the UV bulb and connections.
- Disconnect the UV bulb socket from the power cord socket.
- Slowly remove the UV bulb out of the quartz tube.
- Remove the quartz seal compression nut by turning it anticlockwise. Use a pair of channel-lock pliers if needed. You will notice that there is a stainless steel compression washer which slides over the quartz tube, save the washer for later use.
- Now you are ready to clean the quartz tube.
- Clean the quartz tube by wiping, until clear, using a paper towel or a dry cotton cloth. If needed, a household tub and shower lime removal product can be used. Warning: do not use abrasive cleaners as they can scratch the quartz tube surface.
- Rinse the quartz tube with clean water to completely remove any cleaning products that were used in step 7.
- Reinstall the compression washer over the open end of the quartz tube.
- Reinstall and hand tighten the quartz seal compression nut by turning it clockwise.
- Refill your hot tub with water.
- System Test 1: Assure there is no water dripping from the seal compression nut. If water is visible stop and tighten the compression nut using a pair of channel lock pliers to a maximum of 1/4 turn. If that does not fix the leak, then repeat the steps from step 1. Make sure there is no water leaking before you proceed to step 13.
- System Test 2: Turn the breaker back on. Turn on the pump to circulate the water through the ClearRay system. Wait for 5 minutes and assure no water is dripping. If water is visible, stop, fix the leak by repeating quartz tube maintenance from step 1. Make sure there is no water leaking before you proceed to step 14. Turn the pump and the breaker OFF.
- Reconnect the UV bulb socket to the power cord socket. Make sure you use the latex glove provided when handling the UV bulb. WARNING: DO NOT TOUCH THE NEW UV BULB WITH YOUR BARE HANDS. Oil on your skin will cause hot spots on the UV bulb and shorten the lifespan of your UV bulb. Use the provided latex glove to handle the UV bulb.
- Slide the new UV bulb back inside the quartz tube.
- Reinstall the black bulb boot back over the quartz seal compression nut.
- Reinstall the enclosure cover with gasket and secure with the screws.
- Safely and properly dispose of the old UV bulb.
- Once power is activated you can check the ballast, to see if the ClearRay System is functioning. A solid green light indicates that the ClearRay System is being provided power and should always be on. A solid red light indicates that the UV bulb is activated.
- To re-set your hot tubs ClearRay timer, please refer to your hot tub manual.
WARNING The ClearRay System includes a UV bulb, which contains mercury. Dispose of the bulb in accordance with disposal laws.
You can find a step by step guide to setting up and changing your filtration program within your hot tub product manual. If you haven’t got your manual to hand, you can find yours by clicking here.
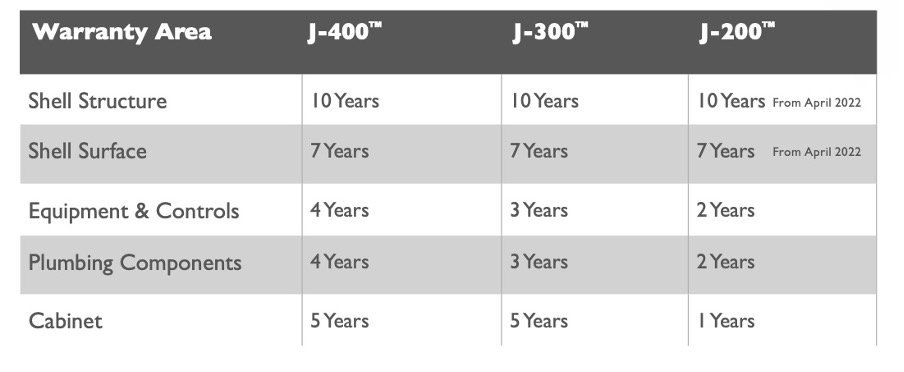
To view our warranty cards, please click here. Please note, in the main your warranty start date will be the date of installation. Please speak with the retailer you purchased your bath from to confirm your warranty program and remaining warranty period.
As local water chemistry can vary significantly across the country, we would always advise you to speak to your local authorised dealer when it comes to balancing and managing your chemicals. They will be best placed to advise you as they will be experienced in managing water in your area.
For further support and advice you can also visit the BISHTA (The British & Irish Spa and Hot Tub Association) website or contact your local water authority.
At Jacuzzi® we only supply genuine Jacuzzi® parts for our products.
To view warranty documentation across our different products, please click here. Please note, in the main your warranty start date will be the date of installation. Please speak with the dealership you purchased your product from to confirm your warranty program and remaining warranty period.
My problem isn't covered here
Please select a contact form below and we will contact you to assist.
I'm looking for information about my bath or shower...
Jacuzzi® UK can no longer supply or provides support for baths or bathroom products.
For out-of-warranty assistance, please contact a reputable plumbing or bathroom repair service.
For warranty enquiries, please email our Customer Care team at customercare@jacuzzigroup.co.uk
Serial number locations vary depending on the type of Jacuzzi® product.
Bath:
On the silver or white label located on the underside of the bath, between the bath pump and a control box.
Sauna, Shower and Steam Cabins:
On the outside of the product technical panel. If this label has been removed or is not there, you should find another one behind the technical panel.
Selected bathroom parts are still available from our online store at shop.jacuzzi.co.uk.
Jacuzzi® bath and shower manuals can be downloaded here.
Contact Us
To ensure we provide you with the best and most prompt service, please select the option that applies to you.
For support with your Jacuzzi® product, please contact your nearest authorised dealer. Find your nearest retailer here.
Customers who have purchased from Jacuzzi® Manchester only, please complete this support form
If your enquiry relates to Jacuzzi® baths or bathroom products, please visit our Bathroom Support page.
If you are a Jacuzzi® retailer, please contact us using the Approved Partner Support form.