Hot Tub Setup: Complete Beginner’s Guide to Setting Up Your Jacuzzi
12 Minute Read
Key Takeaways
- New Jacuzzi hot tubs require antifreeze removal through initial rinse and drain before setup
- Always turn off all power at the circuit breaker before cleaning or maintenance for safety
- Proper water chemistry balance follows this order: Total Alkalinity (80-120 ppm), pH (7.2-7.6), then sanitizer
- Fill water level should be 1 inch below headrests and fully cover all jets for optimal performance
- Initial heating to 102°F takes 6-12 hours, and water testing should occur 24 hours after chemical addition
Setting up your new hot tub represents the beginning of countless relaxing moments—but only when done correctly. Every detail matters, from the foundation beneath your spa to the chemical levels in your hot tub water. This comprehensive guide walks you through each critical step of hot tub setup, ensuring your Jacuzzi delivers the restorative experience you deserve from day one.
Whether you’re a first-time hot tub owner or upgrading to a new Jacuzzi, proper setup prevents costly mistakes and ensures safe, enjoyable soaking for years to come. We’ll cover everything from initial site preparation to your first therapeutic soak, with specific attention to Jacuzzi’s unique requirements and recommendations.
Choosing the Right Location for Your Jacuzzi
The foundation of successful hot tub setup begins with selecting the perfect location for your spa. Your new hot tub will weigh between 3,000 and 6,000 pounds when filled, making foundation requirements non-negotiable.
For outdoor installations, pour a concrete pad 4-6 inches thick with rebar reinforcement to distribute the substantial weight evenly. This thickness prevents settling and cracking under the load of your filled spa. Indoor installations require professional evaluation of floor joists and subfloor structure, as most residential floors weren’t designed to support this weight without reinforcement.
Electrical requirements are equally critical for safe operation. Most hot tubs require a dedicated 220V GFCI circuit installed within 10 feet of your spa. Never use extension cords or temporary outlets, as they cannot safely handle the electrical load and present serious fire and shock hazards. Hire a licensed electrician to ensure compliance with local electrical codes and manufacturer specifications.
Before breaking ground, check local permit requirements and HOA restrictions. Most municipalities require permits for hot tub installation, particularly regarding proper fencing and covers to prevent unauthorized access. This regulatory requirement exists primarily to ensure safety around your installation.
Consider accessibility for ongoing hot tub maintenance when choosing your location. You’ll need clear access to the control panel, filter wells, and drain valves for regular upkeep. Plan for adequate space around your tub to attach cover safety latches when not in use.
Protection from wind enhances both comfort and energy efficiency. Strong winds can significantly increase heat loss and make temperature maintenance more challenging, especially during colder months. Consider privacy screening options that also provide wind protection for optimal enjoyment.
Initial Jacuzzi Preparation and Cleaning
Safety begins before you touch your new hot tub. Always turn off all power at the circuit breaker—never rely solely on the spa switch—before any cleaning or maintenance activities. This critical safety protocol prevents electrical shock in wet environments.
Your new Jacuzzi arrives with antifreeze protection in the plumbing system to prevent damage during shipping. This antifreeze must be completely removed before normal operation begins through a specific flushing procedure.
New Jacuzzi First-Time Setup
Start with a comprehensive cleaning of the actual tub shell using a non abrasive cleaner specifically designed for acrylic surfaces. Avoid household cleaners that may damage the finish or leave residue that affects water chemistry later.
The antifreeze removal process requires multiple fill and drain cycles. First, remove all drain valves from the open or up position and ensure missing plugs are properly installed. Fill your empty hot tub halfway with fresh water through the filter well to prevent air locks in the plumbing system.
Run the hot tub pump for 15 minutes to circulate water through all plumbing lines, then completely drain the system. This initial flush removes most antifreeze from the circulation system. Repeat this process at least twice more to ensure complete antifreeze removal.
During each drain cycle, inspect for any manufacturing defects or shipping damage to the shell, jets, or fittings. Check for loose connections around quick disconnect fittings and ensure all components are properly seated.
Seasonal Restart Procedures
If you’re restarting a winterized unit, begin by reconnecting drain plugs and fittings that were removed for winter protection. Inspect the hot tub cover for damage from winter weather and replace if necessary to maintain proper insulation.
Clean the empty hot tub thoroughly with a soft cloth and appropriate cleaners to remove debris and residue from months of non-use. Pay special attention to the waterline area where buildup commonly occurs.
Check all air valves and bleeder valve positions to ensure they’re properly configured for normal operation. Verify that slice valves are in the correct position according to your owner’s manual before proceeding with filling.
Filter Installation and Maintenance
Proper filter installation is essential for clean water and optimal system performance. Jacuzzi hot tubs use specific filter cartridges designed for your model’s flow rates and filtration requirements.
Locate the filter well in your spa—typically positioned near the main circulation return. Remove the filter housing and inspect the area for any debris or shipping materials. Install new filter cartridges according to the orientation specified in your owner’s manual, ensuring proper seating to prevent bypass.
For optimal performance, establish a rotating spare filter system. While one set of filter cartridges operates in your spa, clean and dry the spare set. This rotation allows continuous operation during cleaning cycles and extends filter life.
Monthly deep cleaning involves soaking dirty filters in filter cleaner solutions designed to remove oils, lotions, and mineral deposits. Rinse thoroughly with a garden hose before returning to service. Never use a pressure washer, which can damage filter media.
Replace filter cartridges every 3-4 months under normal usage, or more frequently with heavy use. Clogged filters restrict water flow, reduce jet performance, and force your hot tub pump to work harder, potentially shortening equipment life.
Filling Your Jacuzzi Hot Tub
Proper filling technique prevents air locks and ensures optimal system performance from startup. Always use a hose filter when filling to remove chloramines, metals, and minerals from your tap water that can affect water chemistry and equipment longevity.
Position the garden hose in the filter well rather than randomly in the spa. This technique prevents air from becoming trapped in the circulation system as you fill. The hose filter attaches easily to any standard hose and significantly improves your starting water quality.
Fill to the proper water level—1 inch below headrests while ensuring all jets are completely covered. This level allows for water displacement when users enter without causing overflow. Monitor the fill carefully, as water level rises significantly when multiple people enter the tub for the first time.
The filling process typically takes 1-2 hours depending on your water pressure and spa capacity. Use this time to review your owner’s manual for model-specific startup procedures and chemical recommendations.
Never power on an empty hot tub or one with insufficient water level. Running pumps without adequate water will damage the heater and potentially void your warranty. Wait until proper water level is achieved before proceeding to the next steps.
Pump Priming and System Startup
Once filled, your hot tub requires proper priming to remove air stuck in the plumbing system and establish normal water circulation. Modern Jacuzzi models often include a priming mode accessible through the control panel that automates this process.
For units with manual priming, locate the bleeder valve near the pump assembly. With the main power on, slowly open the bleeder valve until water flows steadily without air bubbles, then close the valve securely. This process may need repeating for systems with multiple pumps.
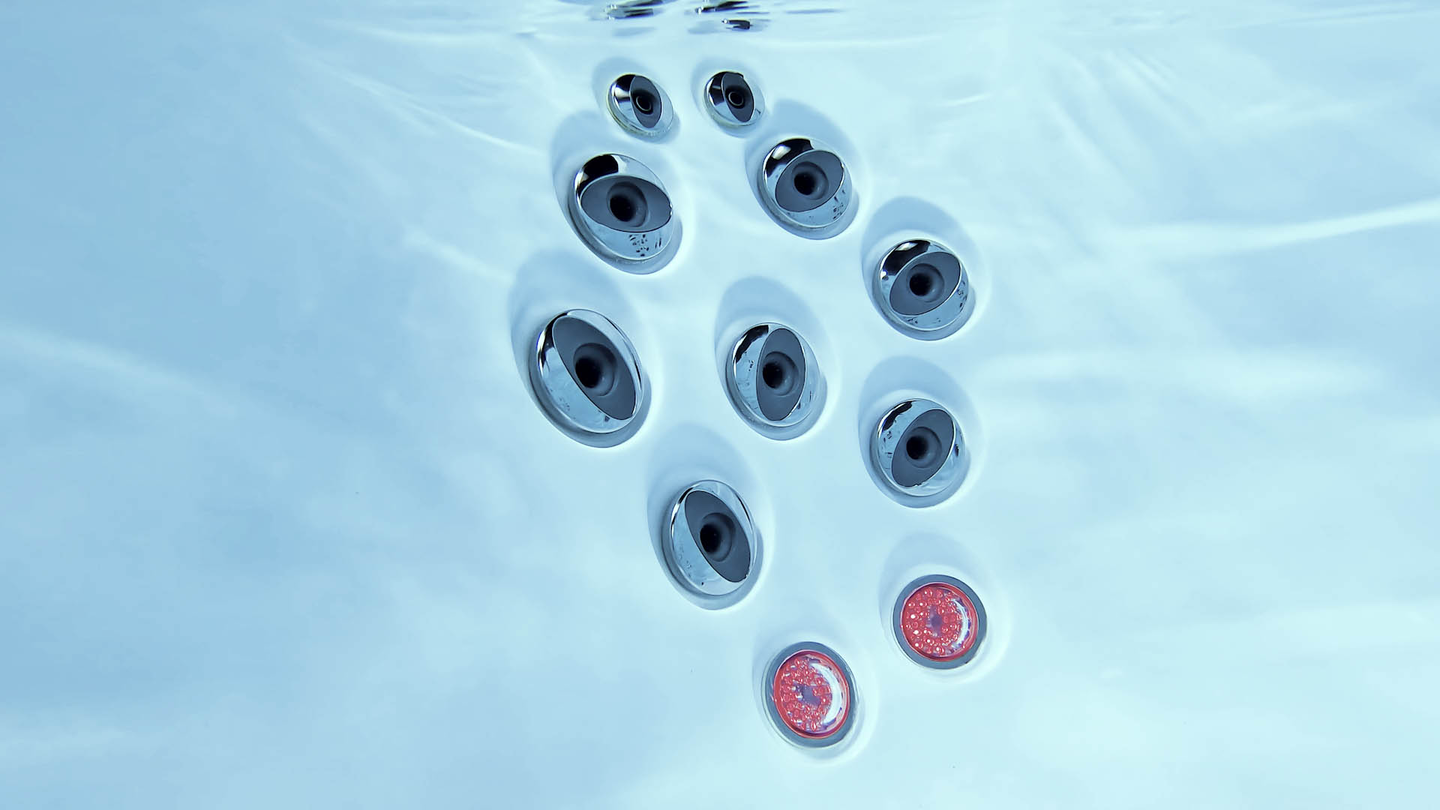
Activate all jets using the control panel to verify proper water flow. Jets running without adequate water flow indicate air locks that require additional priming. Run jets on high speed for 10-15 minutes to help purge remaining air from the system.
If your spa includes an air blower for enhanced bubbling action, test this system separately. The air blower operates independently from water circulation and should produce steady airflow through designated air jets.
Check that water circulate properly through all zones of your spa. Most hot tubs have multiple jet zones that can be controlled independently. Verify each zone operates correctly and produces the expected water flow and pressure.
Monitor the system during initial operation for any unusual noises, vibrations, or leaks around pump connections. Address any issues before proceeding to chemical balancing and heating.
Water Chemistry Setup and Balancing
Water chemistry balance is crucial for safe soaking and equipment protection. Begin chemical treatment only after water temperature reaches at least 80°F (27°C), as chemicals dissolve and react more effectively in warmer water.
The proper balancing sequence is critical: start with total alkalinity, then adjust pH, followed by calcium hardness, and finally add sanitizer. This order prevents chemical interactions that can cloud water or reduce effectiveness.
Testing and Adjusting Water Chemistry
Use quality test strips or a digital testing meter to measure chemical levels accurately. Test your water source initially to understand baseline chemistry before adding any chemicals. Well water often requires different treatment than municipal tap water.
Start with total alkalinity adjustment to 80-120 ppm. Total alkalinity acts as a pH buffer, preventing rapid pH swings that can cause discomfort and equipment damage. Add alkalinity increaser according to package directions for your spa’s water volume—typically around 400 gallons for most hot tubs.
Next, adjust pH to the optimal range of 7.2-7.6. Proper pH ensures sanitizer effectiveness and prevents skin and eye irritation. Use pH increaser or decreaser as needed, adding chemicals gradually and allowing circulation before retesting.
Calcium hardness should measure 150-250 ppm to prevent water from becoming corrosive or scale-forming. This measurement may vary depending on your water source and local conditions. Adjust with calcium hardness increaser if levels are low.
Wait 24 hours between major chemical adjustments to allow complete distribution and reaction. Test the water again before making additional changes to avoid overcorrection and chemical waste.
Add sanitizer last—either chlorine shock or bromine according to your chosen system. Follow specific instructions on your start up chemicals for initial dosing, typically higher than maintenance levels to establish a proper sanitizer reserve.
For ongoing maintenance, test chemical levels twice weekly and adjust as needed. Weekly shock treatment with non chlorine shock or chlorine shock helps oxidize contaminants and maintain crystal-clear water.
Temperature Setting and Heating Process
Set your desired water temperature through the control panel, typically 100-102°F (38-39°C) for comfortable soaking. The maximum safe temperature limit is 104°F (40°C) per safety regulations—never exceed this limit as it can cause overheating and health risks.
Initial heating takes 6-12 hours depending on starting water temperature, ambient conditions, and your spa’s heater capacity. During colder months, expect longer heating times as your system works against heat loss to the environment.
Use your hot tub cover during the heating process to retain heat and reduce energy consumption. A properly fitted cover can reduce heating time by 25-50% and is essential for efficient operation year-round.
Monitor temperature rise during initial heating to ensure the system operates correctly. Temperature should increase steadily at approximately 2-4°F per hour. Slower heating may indicate air locks, dirty filters, or electrical issues requiring attention.
Energy-efficient temperature management involves maintaining consistent temperature rather than heating from cold repeatedly. Lower the temperature slightly when away for extended periods, but avoid completely turning off heat as recovery time and energy consumption often exceed savings.
Final System Check and Cover Installation
Allow 24 hours of circulation with the cover in place before your first soak. This period ensures complete chemical distribution and allows the water to reach thermal equilibrium at your desired temperature.
Test all safety features before initial use, including the GFCI protection at the electrical panel. Monthly GFCI testing is recommended by pressing the test button to ensure continued protection against electrical shock.
Perform a final water chemistry test to confirm all levels are within safe ranges: chlorine or bromine levels below 5 ppm, pH between 7.2-7.6, and total alkalinity between 80-120 ppm. Only enter the spa when all chemical levels are properly balanced.
Install your hot tub cover according to manufacturer instructions, ensuring all locking mechanisms function properly. The cover provides thermal insulation, debris protection, and safety compliance. Never leave children unattended around an uncovered spa.
Verify that your spa’s circulation pumps operate on their programmed schedule. Most Jacuzzi hot tubs include automatic circulation cycles that maintain water quality between uses.
Document your setup date, initial chemical readings, and any warranty information in a maintenance log. This record helps track patterns and ensures you meet warranty requirements for chemical balance and maintenance.

Regular Maintenance Schedule for Your Jacuzzi
Establishing a consistent hot tub maintenance routine from day one prevents problems and extends equipment life significantly. Weekly maintenance takes just 15-20 minutes but saves hours of troubleshooting later.
Weekly Tasks:
- Test water chemistry with test strips and adjust as needed
- Check ph levels and adjust to maintain 7.2-7.6 range
- Add sanitizer to maintain proper sanitizer levels (1-3 ppm chlorine or 2-4 ppm bromine)
- Rinse filter cartridges with clean water to remove surface debris
- Empty and clean skimmer baskets if equipped
Monthly Tasks:
- Perform deep filter cleaning using filter cleaner products
- Clean waterline with non-abrasive cleaners to prevent buildup
- Shock treat water with non chlorine shock to oxidize contaminants
- Test and record calcium hardness and alkalinity levels
- Inspect cover for wear and clean with appropriate cover cleaners
Quarterly Tasks:
- Complete drain and refill every 3-4 months or when Total Dissolved Solids exceed 2000 ppm
- Replace filter cartridges with new units
- Deep clean spa shell with appropriate cleaners
- Inspect all electrical connections and components
- Professional water analysis if chemistry remains difficult to balance
Annual Tasks:
- Replace filter cartridges regardless of apparent condition
- Professional equipment inspection and tune-up
- Cover replacement if showing signs of deterioration
- Review warranty requirements and schedule any covered maintenance
Consistent maintenance prevents most common hot tub problems and ensures your Jacuzzi provides years of reliable therapeutic benefit. The small time investment pays significant dividends in reduced repairs and enhanced enjoyment.
Troubleshooting Common Setup Issues
Even with careful attention to procedures, new hot tub owners sometimes encounter issues during initial setup. Understanding common problems and solutions helps you address concerns quickly and confidently.
Cloudy Water Issues: Cloudy water typically results from inadequate filtration, chemical imbalance, or insufficient circulation. First, check that filter cartridges are properly installed and clean. Run jets on high speed for 30 minutes to enhance filtration, then retest water chemistry. High pH or low sanitizer levels commonly cause cloudiness.
If cloudiness persists after 24 hours of proper circulation and balanced chemistry, shock the water with chlorine shock to oxidize dissolved contaminants. Sometimes new spa owners add too many other chemicals initially, overwhelming the filtration system.
Foamy Water Problems: Foamy water usually indicates soap residue from bathing suits, lotions, or cleaning products. Prevention involves showering before use and avoiding soaps or bubble bath in your spa. Low calcium hardness can also contribute to foaming by making water too “soft.”
To eliminate existing foam, use a foam reducer product designed for spas. Long-term prevention requires maintaining proper water balance and educating users about pre-soak hygiene. If foam returns quickly, consider draining and refilling with fresh water.
Heating Problems: If your spa heats slowly or not at all, first check that all jets are flowing properly. Air locks in the system prevent adequate water flow through the heater, making heating impossible or inefficient. Review the pump priming procedures and repeat if necessary.
Dirty filters can also restrict flow and prevent proper heating. Clean or replace filters if they appear clogged. Finally, verify that your temperature setting hasn’t been accidentally changed and that the cover is properly installed during heating periods.
Low Jet Pressure: Weak jet pressure almost always indicates air locks in the plumbing system. Turn all jets to maximum flow and run pumps continuously for 15-20 minutes to help purge trapped air. If pressure remains low, locate and open the bleeder valve near the pump to manually release air.
Sometimes debris in jet faces restricts flow. Remove jet faces according to your owner’s manual and rinse them clean. Mineral deposits can also accumulate in jets—soak removed faces in white vinegar to dissolve buildup.
When problems persist despite following troubleshooting steps, contact Jacuzzi customer service or certified technicians. Complex electrical or plumbing issues require professional expertise to avoid damage or safety hazards.
FAQ
How long does it take for a new Jacuzzi to heat up after initial setup?
Most Jacuzzi hot tubs take 6-12 hours to reach 102°F from cold fill, depending on ambient temperature and heater size. Larger models with multiple heaters may heat faster, while single-heater units take longer. During winter months, expect heating times toward the upper end of this range.
Can I use regular household bleach instead of spa chemicals in my Jacuzzi? While household bleach can work temporarily, spa-specific chemicals are formulated for hot water conditions and won’t affect pH as dramatically. Never use bleach with additives or scents, as these can cause foaming and skin irritation. Spa chemicals also include stabilizers that help maintain consistent sanitizer levels.
What should I do if my Jacuzzi jets have low pressure after setup?
Low pressure usually indicates air locks in the plumbing. Try running jets on high speed for 10-15 minutes, or locate the bleeder valve (usually near the pump) to manually release trapped air. If this doesn’t resolve the issue, check that filters are clean and properly installed, as restricted water flow reduces jet pressure significantly.
How often should I change the water in my new Jacuzzi hot tub?
Plan to drain and refill every 3-4 months, or when Total Dissolved Solids exceed 2000 ppm. Heavy usage may require more frequent changes—a general rule is every 2-3 months with daily use. Fresh water ensures optimal chemical effectiveness and prevents buildup of contaminants that filtration cannot remove.
Is it safe to soak immediately after adding startup chemicals to my Jacuzzi? Wait at least 20 minutes after adding chemicals and ensure chlorine/bromine levels are below 5 ppm before entering. Test water chemistry to confirm safe levels before your first soak. High chemical levels can cause skin and eye irritation, while proper levels provide safe, sanitized water for your relaxing soak. Happy soaking begins with patient preparation.
Learn More With Our Hot Tub Buying Series
Unlock the secrets to the perfect hot tub with our exclusive email series. Get expert advice and tips right in your inbox. Subscribe now and take the first step towards finding your ideal hot tub.
Hot Tub Buying Series
Explore Categories


Explore Products


Swim Spa
La toute dernière technologie de courant de nage puissant et les performances historiques des jets Jacuzziᴹᴰ PowerProᴹᶜ se combinent pour offrir une nage parfaite, tout au long de l'année.
Sauna
Jacuzzi® Infrared Saunas are engineered with full spectrum (near, mid and far) front-facing IR heaters, along with Red Light therapy. Enjoy a comprehensive sauna experience in a single sauna session.